

how to unclog a kitchen sink with a garbage disposal best guidelines?
Kitchen sinks are basic components of any family, encouraging every day chores and supper arrangements. In any case, when a sink gets to be clogged, it can rapidly disturb the stream of family exercises. Among the different sorts of sink blockages, managing with a clogged kitchen sink prepared with a transfer unit can be especially challenging. In this direct, we’ll investigate viable strategies to unclog a kitchen sink with a transfer, guaranteeing a smooth and productive seepage framework for your kitchen.
First Step: Security Initially
Make sure the waste disposal is off by turning off the power. To prevent mishaps, unplug it or turn off the circuit breaker.
Step 2: Preliminary Inspections
Examine any obstructions. Using a flashlight, examine the disposal’s inside to check for any obvious obstructions. For any big things, remove them with pliers or tongs.
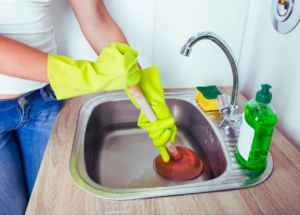
3. Make Use of a Plunger ump in the Deep End:
Half fill the sink with hot water. Make sure the drain is tightly sealed by placing a sink plunger over it. Forcefully pump the plunger up and down many times. Verify whether the water begins to drain. If not, carry out step one again.
Step 4: Restart the Appliance
Reset Button: Look for the button located on the garbage disposal’s underside. To reset the gadget, press it. Use vinegar and baking soda
Step 5: All-natural Cleaner:
Fill the drain with half a cup of baking soda. Add one cup of vinegar after that. Give the mixture ten to fifteen minutes to sit. Use hot water to flush.
Step 6: Turn the crank by hand
By hand Flip the Garbage Can:
Find the little hole in the shape of a hex at the disposal unit’s bottom.
Take a 1/4-inch hex wrench and put it in the opening. To manually twist the blades and loosen any debris that has been lodged, turn the wrench back and forth. Check the P-Trap.
Step 7 Empty the P-Trap:
Underneath the P-trap (the U-shaped conduit beneath the sink), place a bucket. To remove the P-trap, unscrew the slip nuts using a tool.
Make sure it’s clean and free of obstructions. Check if the blockage has been cleared by reassembling the P-trap.
Step 8: Use hot water to flush.
Last Flush: To make sure the drain is clean, run hot water down the sink.
Step 9: Check and reconnect
Reconnect and Test: Re-plug the garbage disposal or flip the circuit breaker on. To make sure the disposal is operating properly, test it.
Prevention Advice Steer clear of hard materials:
Hard items like shells, fruit pits, and bones shouldn’t be disposed of in the trash.
Use Cold Water: To make any grease or oils more easily ground, put cold water down the disposal at all times.
Regular Cleaning: To avoid accumulation, clean the disposal on a regular basis using vinegar and baking soda.
To prevent harming your plumbing system, it would be necessary to speak with a professional plumber if the obstruction still exists after attempting these solutions. People like our, How to Unclog a Kitchen Sink with a Disposal best way?
Understanding the Problem :
Causes of a Clogged Kitchen Sink with a Disposal
Clogs in kitchen sinks with transfers frequently happen due to the amassing of nourishment particles, oil, and other flotsam and jetsam. These substances can cling to the transfer edges or get caught in the channels, slowly shaping a blockage that obstructs water flow.
Signs to Recognize a Clog
Identifying a clogged kitchen sink with a transfer is significant for incite mediation. Common signs incorporate moderate waste, unsavory odors exuding from the sink, and a murmuring sound when water is running. Furthermore, water backing up into the sink after running the transfer demonstrates a potential clog.
Preparation
Before endeavoring to unclog the sink, accumulate the vital apparatuses and materials. You’ll require a match of elastic gloves, a bucket or bowl to capture water, a plunger, a plumber’s wind or wood screw, preparing pop, vinegar, and bubbling water. It’s too basic to prioritize security by turning off the control to the transfer unit to maintain a strategic distance from any inadvertent activations.
Step-by-Step Guide
- Turning off Control to the Transfer: Find the switch or circuit breaker that controls the transfer unit and turn it off to anticipate inadvertent operation.
- Clearing Unmistakable Blockages Physically: Put on elastic gloves and evacuate any obvious flotsam and jetsam or nourishment particles from the transfer utilizing tongs or a spoon. Dodge putting your hand down the transfer to avoid injuries.
- Using Normal Cures or Commercial Cleaners: Pour a blend of heating pop and vinegar down the deplete, taken after by bubbling water. Then again, utilize a commercial deplete cleaner particularly outlined for transfers, taking after the manufacturer’s instructions.
- Checking the Trap and Channels for Hindrances: Put a bucket or bowl underneath the trap, at that point utilize a torque to extricate the associations and expel the trap. Check for any obstacles, such as nourishment buildup or cemented oil. Clean the trap completely some time recently reattaching it.
Maintenance Tips
To anticipate future clogs in your kitchen sink disposal:
- Avoid putting expansive amounts of nourishment scraps or sinewy materials down the disposal.
- Run cold water whereas working the transfer to cement oil and flush absent debris.
- Regularly clean the transfer by pounding ice 3d shapes and citrus peels to refresh the unit and evacuate buildup.
When to Look for Proficient Help
If the clog holds on in spite of your endeavors or if you experience any signs of a more extreme issue, such as spills or interesting clamors coming from the transfer, it’s fitting to contact a proficient handyman. Endeavoring complex repairs without the fundamental ability can lead to encourage harm and expensive repairs.
Conclusion
A clogged kitchen sink with a transfer can disturb the usefulness of your kitchen and cause bother. By taking after the steps sketched out in this direct and actualizing preventive support measures, you can successfully unclog your sink and guarantee smooth waste. Keep in mind to prioritize security and look for proficient help when required to address any fundamental issues instantly.
FAQs (Frequently Asked Questions)
Can I use chemical drain cleaners in my disposal unit?
It’s best to avoid using chemical drain cleaners in disposals as they can damage the unit and harm the environment. Opt for natural remedies or disposal-specific cleaners instead.
How often should I clean my kitchen sink disposal?
Aim to clean your disposal at least once a month to prevent buildup and odors. Regular maintenance can extend the lifespan of your unit.
Why is my disposal making unusual noises?
Unusual noises such as grinding or rattling may indicate mechanical issues or foreign objects trapped in the disposal. Discontinue use and consult a professional plumber for inspection and repairs.
Can I unclog my kitchen sink without removing the disposal?
In most cases, you can unclog your sink without removing the disposal by following the steps outlined in this guide. However, severe clogs may require accessing the pipes beneath the sink.
What should I do if my sink is still clogged after trying these methods?
If your sink remains clogged despite your efforts, it’s best to contact a professional plumber to assess the situation and provide effective solutions.